This project took almost a year even though the vision came very quickly
and I knew exactly how I wanted it to look last May. Now it's June of
the following year and while I get frustrated by how long things take
(not at all because of the actual making, simply from life demands and poor prioritizing of my time), I'm grateful to finally
be done. Last year in July, Michelle helped me lace bark onto my table since I needed two of us working simultaneously to make sure nothing dried too quickly. Essentially, I had to lace out and hammer together bark to make panels big enough for the body of the garment (then not get around to it until the following spring).
You saw this in the post about printing these pattern pieces. The easiest part is cutting the pieces. Seaming them sucks because there's not enough material to run it through a sewing machine. But the joy of making paper and bark garments (for art! Not wearing) is the option of glue.
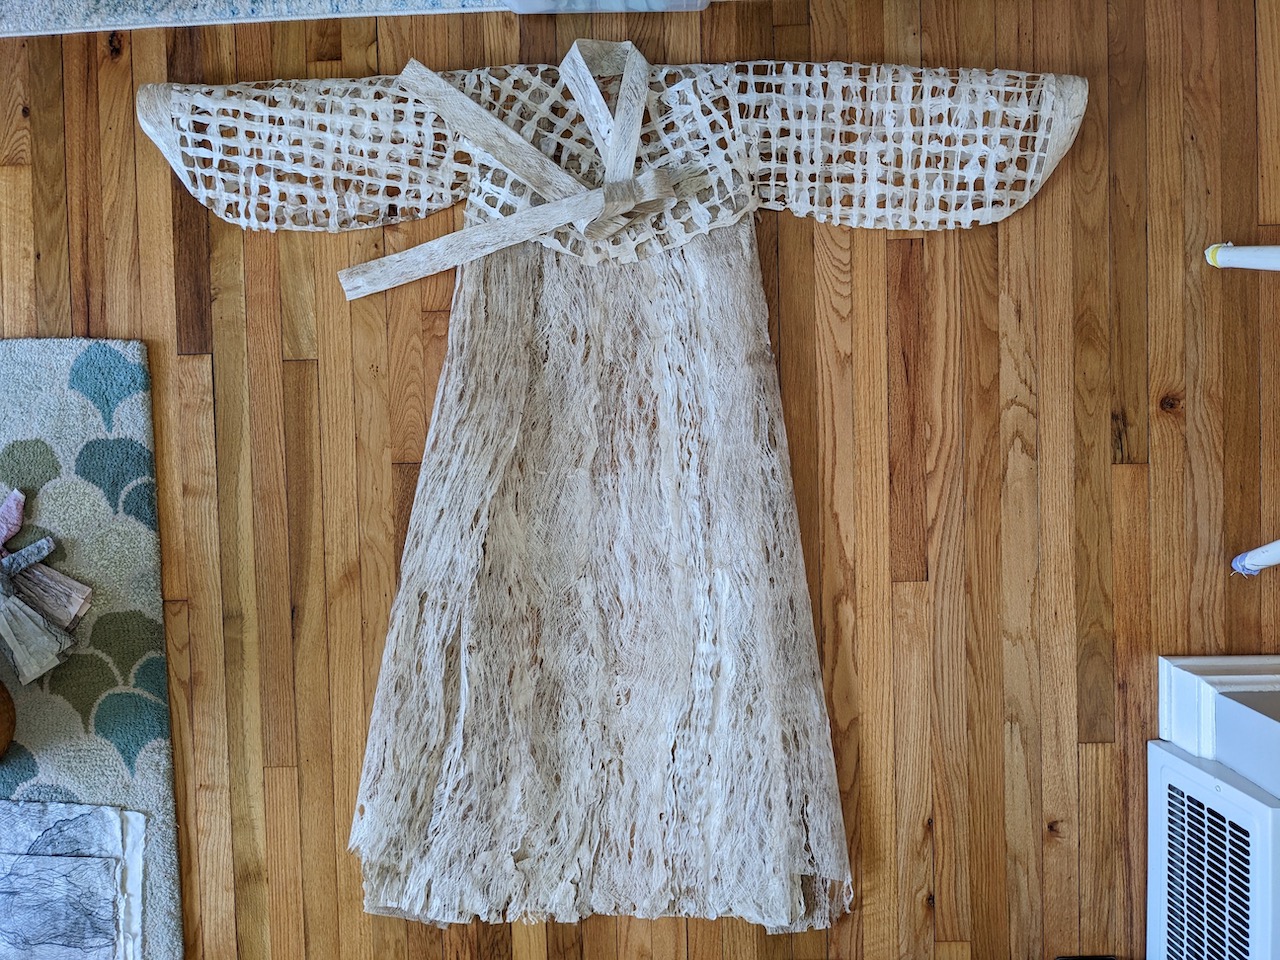
I used PVA for this process and had to score all of the seam allowances and fold over each bit to the right direction, and then glue each bit to the other side, and hope there was a place for it to land. Easy to press in the early stages and not as the garment grows. I chose laced bark for the collar to contrast with the gridded bark of the jacket (jeogori in Korean).
One arm on, with more laced bark for the cuff. Of course, turning pieces inside out is NOT an option.
Second arm on. Then, major problem solving because I didn't have enough of the initial gridded bark panel for all pieces of the jacket. So I used a different panel that I made at a different time with a different batch of paper mulberry bark (all Thai kozo). There is a reason you should work with uniform batches whenever possible. It looked thinner and browner, so I took offcuts of the original grid to glue over the second arm to visually match the other arm. But it wasn't enough to go everywhere, only the most obvious sections, like an optical illusion.
Last bit of the jeogori is the goreum: the ties. Right now they are not attached. Since they are doubled-over laced bark, they are sturdy and I saw no safe way to attach this to the lighter-weight grid. I did make the knot after gluing so that they would dry almost sculpted into place. Then I put it aside to deal with at the end.
Once the top was done, I took a break because I did not want to face the difficulty of the skirt, and dove into finishing more pieces. The very top is the pressure printed version of the bark, the one below that is the ghost print from the pressure printed plates. The third is a mashup of many, many pieces of hanji that were printed from direct inked bark lace. Of course I finished ALL of those skirts before I could even think about the bark skirt, which is always how I get things done.
Then I finally had to deal wrangle the
chima (skirt). I decided early not use the grid (to the left) and only use straight bark lace.
How to navigate turning rectangular bark panels into a believable skirt that matches the top?
I made deep darts at the very sides (in retrospect they would have looked better as true darts closer to the center, but dealing with these large panels that have their own material qualities made me take the safer route. If I ever do it again—please don't make me do it again—I can test other methods) in both the back and front panels. This for sure would not work as the traditional pleated wrap-around skirt, and would have required at two to three times as much width. One panel can take five hours of lacing out, depending on how well cooked the fiber is, the look you want, and how the tree decides to have its way with you.
Since I wasn't sewing these, more glue and more weights. Working on the floor was not great for my hip issues but I'm so used to constructing my garments at home and not the studio.
To the right is the waistband piece that will connect the front and back panels.
After I glued the front and back together (what a job! I am so averse to washing glue brushes, and there were so many open gaps, that I squeezed and smeared PVA on waste paper with my fingers and transferred to lace. My hands were covered in glue the whole time), I layered two more side panels to make it look a little less rigid and increase the angling out of the skirt.
The non-photographed process include the straps for the skirt, which required hand basting and then serious wrangling with the sewing machine to sew the first end of each strap. Also, I had to hand sew tiny hook and eye closures for the ties. That was as unfun as I expected but the nice discovery at the end was that I could forgo an eye for the last hook because I could simply hook it onto the open grid! Which I reinforced in that location with a bit more PVA and extra bark.
Also not photographed: the process of getting all of this art from my house to my car to New York and then the very sweaty process of shooting it. I do not want to think about what my life would be like without such a skilled and reliable photographer, and one who is kind enough help at the vehicle with unloading (and later loading), while working without A/C because it would blow all the art around.
In this detail you can see a bit of the straps showing through the jacket. Not excited to figure out the best way to hang this for studio visits/storage but very happy that I managed to finish twelve new pieces and get them shot. Always grateful for successful road trips and the flexibility to be able to squeeze them in.
Pressure printing bark lace and grid pattern pieces
The best photographer an artist could ask for: Stefan Hagen
New dress images at the top of the page!