I had waited until my beater was up and running before posting the whole story but halfway through writing, I lost it, and now this interface is fighting with me! I've been thinking about superstition lately and this confirms there is some kind of hex on me with this beater. The beginning of the story starts here so I may repeat myself. Basically, I tried to make my beater deal with rag and didn't stop when it stalled out the first time, I simply unclogged and started again, only to make it jam so badly that it refused to budge. After hours, then days, of trying to unclog while the beater was intact, we finally opened it.
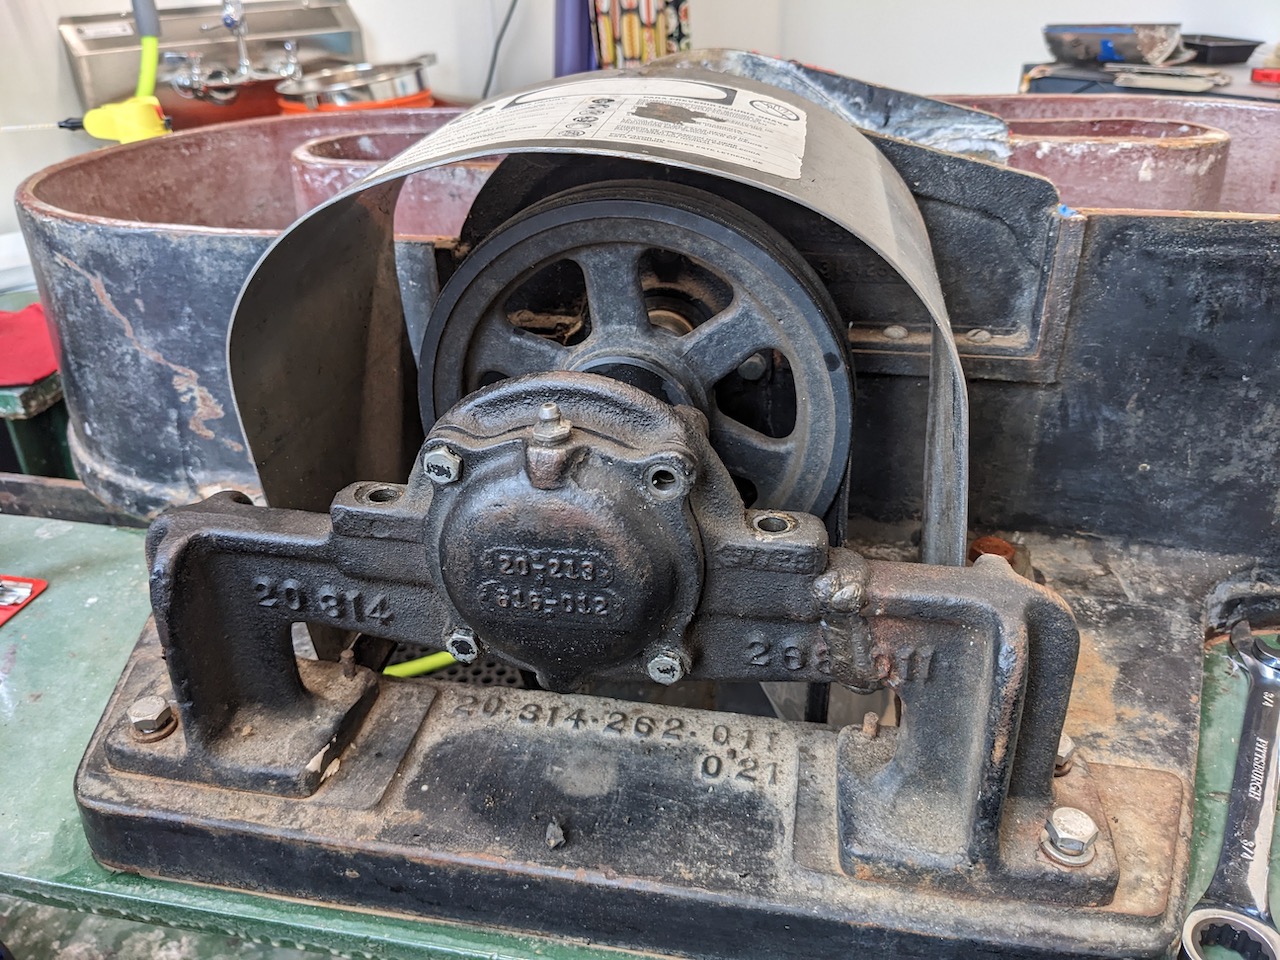 The only reason I considered this overhaul was because my friend Bill, who is extremely mechanically inclined and owns all the tools you'd need to do so, agreed to help me. Here, he has started to remove the bolts for the outer bearing cover. Remember throughout that I do not know all the official names for everything, nor am I mechanically inclined, so it's going to a be a very thingamajiggy story.
 The bearing is visible. The history of me and this machine: I bought it from the west coast where it had been sitting outdoors, unused, for years. It has been taken apart at least once before (you can see on the right side of the arm that it was brazed together. Under the feet are locating pins that were sheared away). Jinxed from the start: the sellers misquoted the weight by almost half, it fell over in the truck on the way over, it took four people to help get it upright and into a gutted building with steps, no electricity, and open broken pipes sticking up from the floor. I replaced the diaphragm and tried to refinish it, terrible idea to do that in the summer when it's dusty and dark and humid. That's why the epoxy was drippy and uneven, I couldn't see and abandoned it for a while. But I refused to take it apart and sandblast.
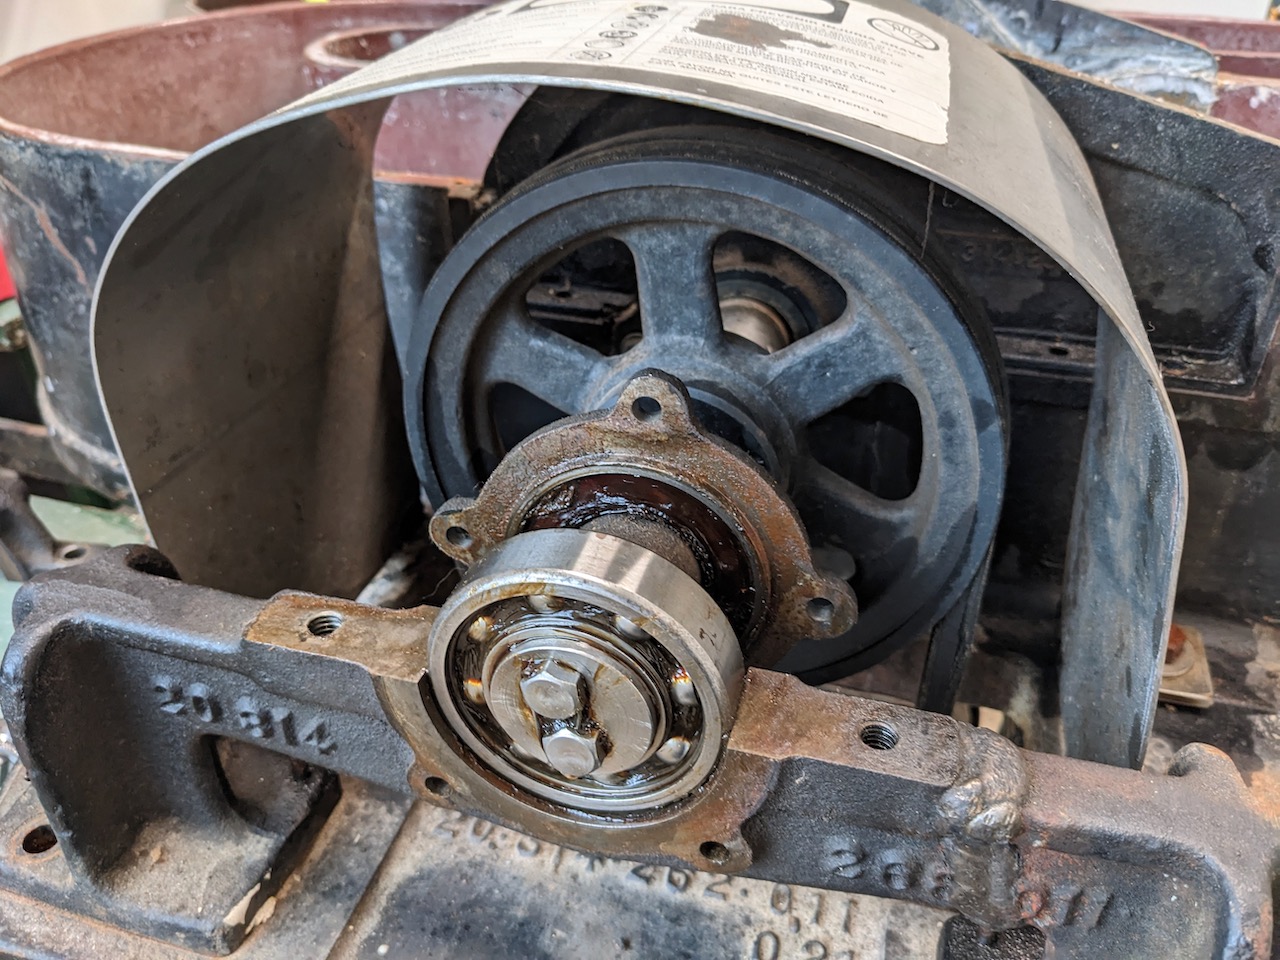 Now the top semicircular cover over the bearing is off and its back cover is also backed off. My main papermaking is Korean style, which doesn't use a Hollander. But the first beater I ever learned on was a Valley, and next to it a Reina. I have since used different versions of both, along with other types of beaters (I really enjoy Howie Clark's old beaters). But the Valley was always my workhorse favorite.
 This is the location of the leaking that dripped onto the motor housing, which made me nervous. I've seen others put a concrete mixing tray underneath the machine to catch water. I was curious to see what was there: disintegrated cork material and old dried pulp.
 Then Bill took the support arm away (we later propped it with a 2x4 scrap), and that's when we discovered that the locating pins had been cut away. One should be sticking up near the two bolt holes.
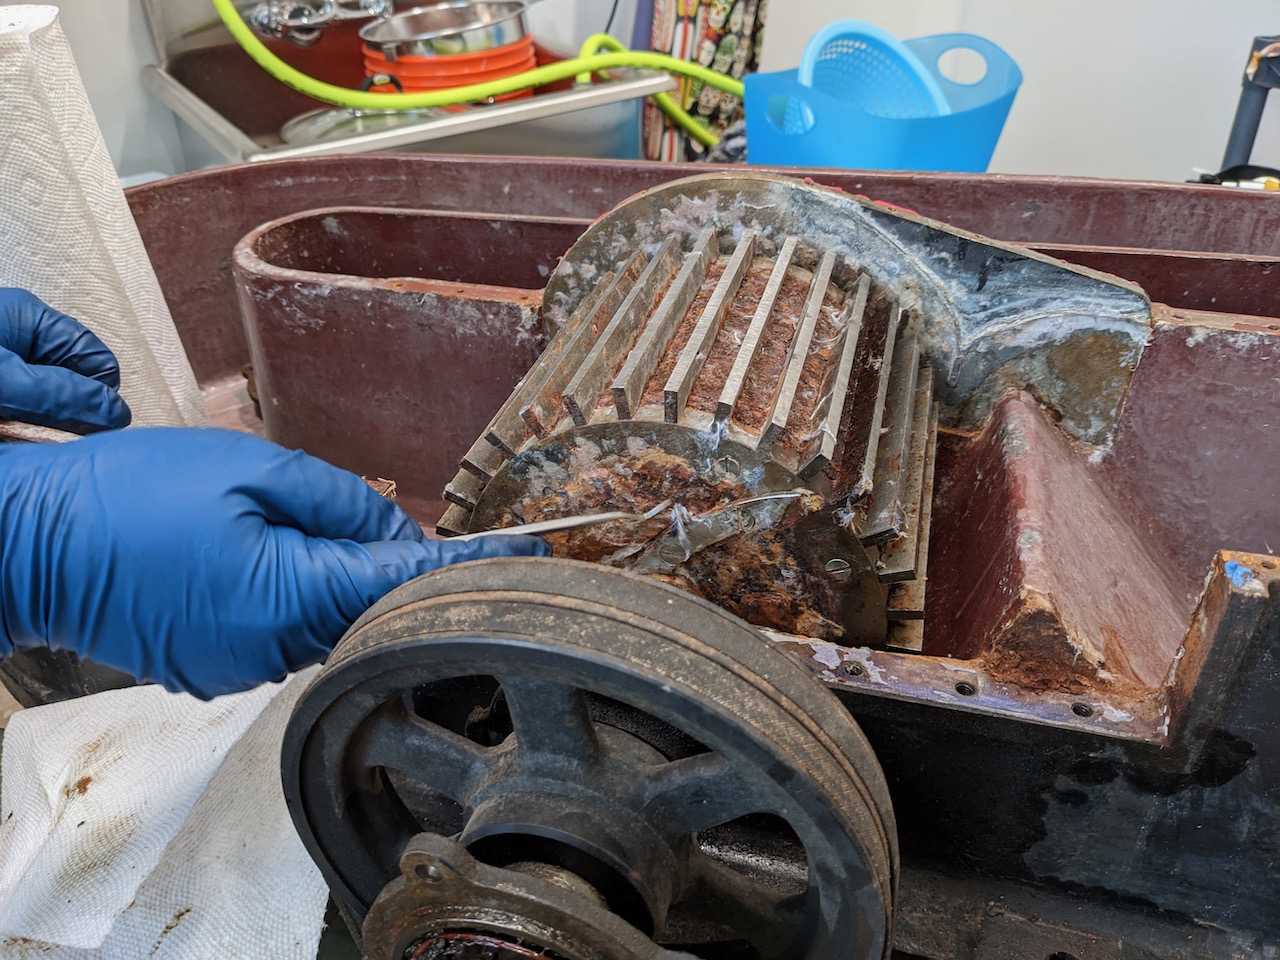 Once the side shields started to come off we could see a bit more of what was going on. More rust, dried pulp, and messy trough walls immediately next to the roll. The shield near the midfeather hasn't been removed yet and you can see where the baffle/doctor for the top lid falls, it's metal soldered to the lid that shapes around the roll and then pops up again to clear the backfall, that hill on the right.
 Then Bill unbolted the motor so we could tip it over and remove the belts.
 At this point he could finally get the rag jam out, as big as a rat! You can see the bits of cork seal in pieces near the wrenches.
  The support arm in the midfeather was so stuck with years of pulp, dust, who knows what, that even after unbolting, it wouldn't come loose. Bill had to screw into the locating pins to remove enough of their shafts to get the assembly to budge. We had to get the entire assembly, arm and all, out at once because in the midfeather section, it's impossible to unscrew the cover of the bearing that would free up the shaft; not enough clearance. It's all horribly heavy.
 Here's the shaft assembly after Bill got it out of the other arm, and after we dropped it. The latter was an accident but fortunately the assembly, floor, and our feet survived. Weirdly, the outer bearing refused to move and that's why it is still on (to the very right).
  Once Bill got to the bearing on the other side, it slid right off with no problem!
 Left side: bearing won't move. Right side: bearing free so that we can remove covers and clean them, plus get a new intact seal on.
 Both sides of the roll had heavy scoring on the shaft where it sits over the trough.
 And on the other side of the shaft a lot of wear that looked like someone was grabbing and wrangling it for dear life.
 At this point, we agreed that Bill would take the assembly to his home shop to wire wheel and clean up, while I scraped and refinished this part of the trough that I could never access when I did my first run. That's where a LOT of the rust and paint were coming from. I didn't get before pics, as this is after I've gotten some of the worst chunks off. I removed the bedplate, diaphragm, and frames from underneath and wrapped everything underneath (the extension arm and the motor) to keep dust and epoxy drips out.
 Years before, and every step of the way during the process, I was in constant email communication with four very generous men. All of them own a Valley beater or have worked with them extensively. Two are incredibly gifted woodworkers and makers all around (both built their own houses), and the other two have given me lots of advice over the years. I went in a kind of circle, to see who I could harass on what schedule. As someone who gets a lot of unsolicited questions, I didn't want to overburden anyone, but had a lot of late-night panics about various steps. While Drew Matott highly recommended POR-15, I don't have good ventilation and didn't want to roll this thing outdoors. Plus, the finish is usually black and I like to see what is going on underneath. So I started with a less scary rust remover and wrapped the trough as best I could overnight (well, something came up and it was there a couple of nights).
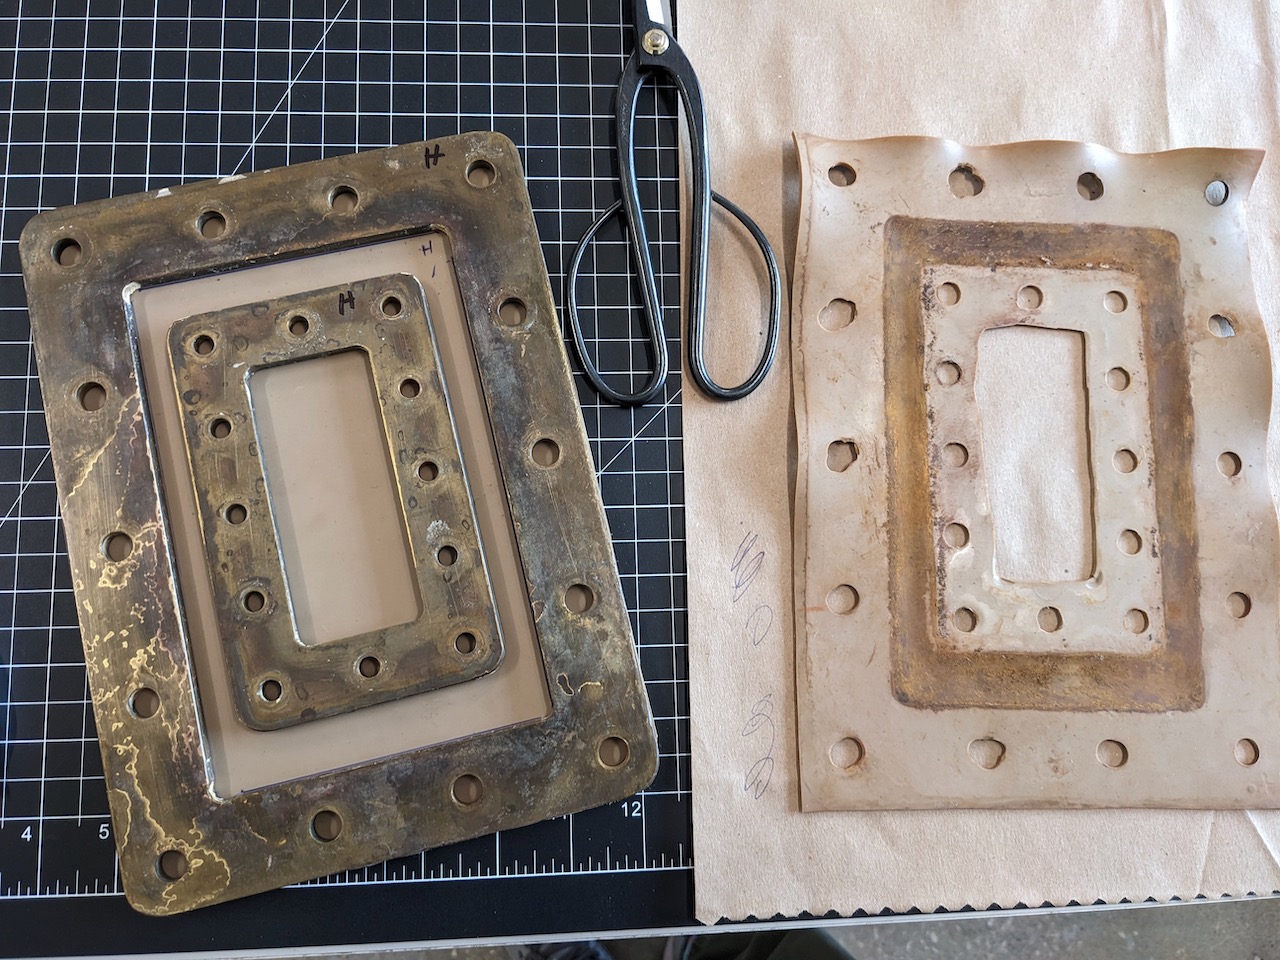 While I didn't have to, I cut and punched a new diaphragm. A lot of the rusty looking gunk on the previous one to the right comes from my desperate spraying of PB penetrating oil onto the roll in hopes that I could scrape away the worst of the rust with a giant screwdriver. That ended up not being the best option and the whole beater room and my body smelled like that stuff for days.
 I forgot that the first diaphragm didn't seat well with smaller punched holes, so I had to re-punch the inner set of holes with the same size punch as the outer set (those bolts are bigger than the inner frame). At least I realized before I installed it! Which...when I did, I don't know how I did it the last time (which I actually did three times because I kept messing up the order) on my own in the dark. Bill helped hold the arm where I needed it and made suggestions for how to do it. Because of motor placement under the machine, you can't lay down and look up like a car, it's all very awkward.
 It looks awful, but part of the reason that the existing epoxy is so cloudy is that I didn't realize when I first coated it that there was still water in the bedplate area, which contaminated the epoxy—West System marine epoxy. By then it was too late to fix. I was also not very finicky about dust and drips and later got under the machine to dremel away the biggest drips so that the diaphragm would fit tightly.
  Meanwhile, at Bill's shop, he had gotten a new press to try and get the roll off (this was my biggest middle-of-the-night panic, "Don't do it!!") only because that stuck bearing wouldn't come loose on the other side (the idea being, if the roll came off, you could replace the cork seal on the other side of the roll without removing the pulley wheel and bearing). The roll did not budge and neither did the pulley wheel. At some point the wheel shattered; fortunately, it's not hard to replace. You can see the outer rings of the roll and roll all cleaned after fastidious wire wheeling. He also cleaned ALL of the nuts, bolts, hardware, etc.
 New pulley wheel!
 And he got a new key for the pulley wheel where it had seized up before. I asked him to sharpen the flybars that had gotten a bit dull in the cleaning process, though later one of the very nice men said that they don't need to be super sharp.
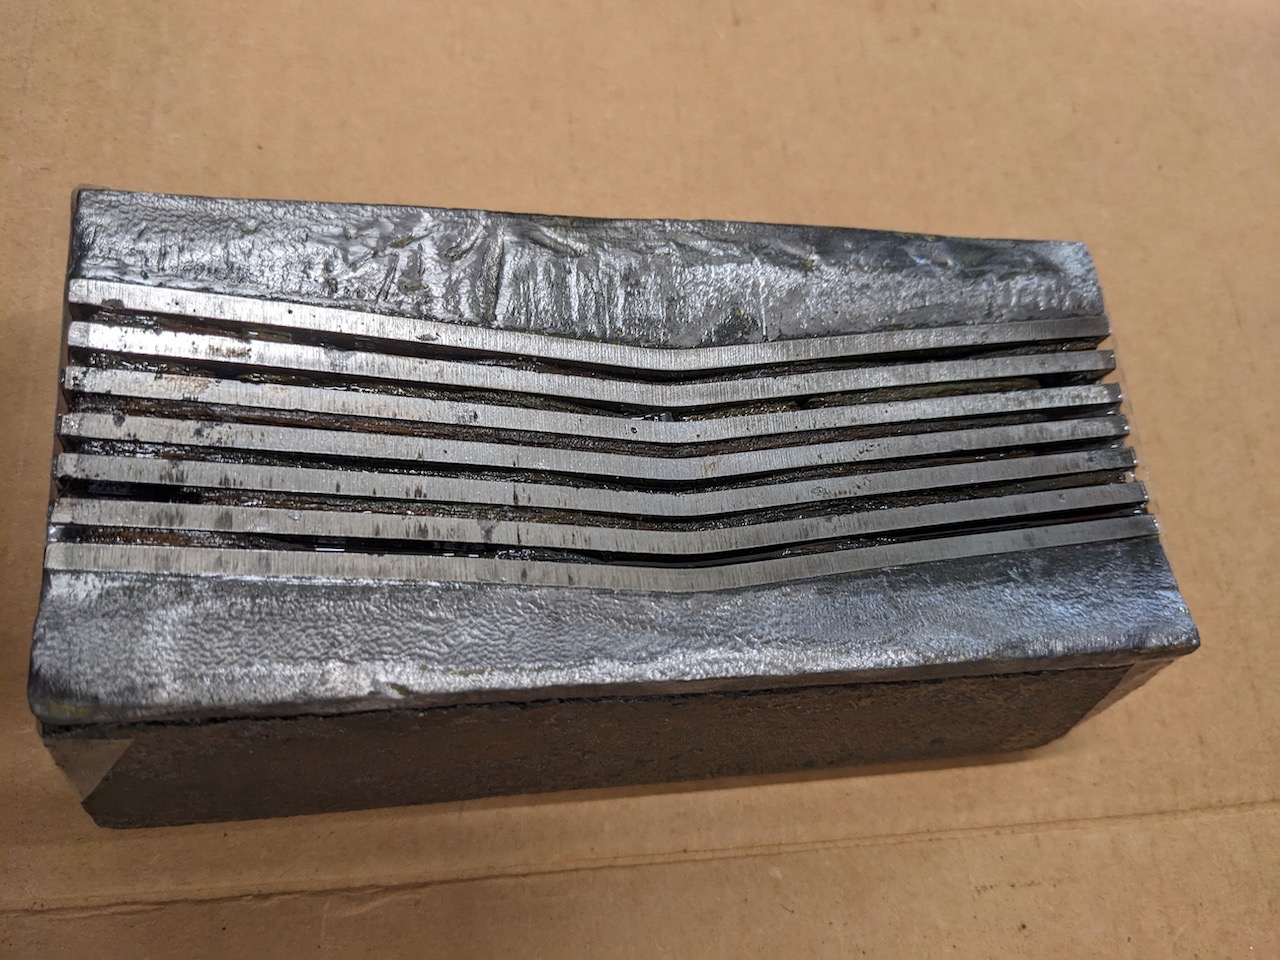 He even got the bedplate de-rusted! The woods between the bars were disintegrating and bits were falling out so I taped the sides and squirted more epoxy in the gaps to try and hold what was left.
 Since we were cursed from the start by the bearing gods, the new bearing on the midfeather end refused to seat! It was off by about a quarter inch and Bill wanted to see if we could get away with that. It was another nightmare to seat the entire assembly and we hacked scraped a bit of the new epoxy and dropped it on both of our fingers at certain points (at least I did, and that hurt). It was not going to clear (you can see it's closer to the outer wall) so we had to do what he did with the first stuck bearing: saw it off! After he had sawed off the old outer bearing, the new one seated just fine, but this inner bearing that was so easy to remove suddenly wouldn't seat fully and then wouldn't come off.
 Bill had enough of this ridiculous heavy-weight maneuvering (if I was taller and stronger, it might have been easier. But I've seen plenty of pictures and witnessed in real life that people hoist the roll, so I was well aware of the weight), and built a hoist at home so that we wouldn't have to risk our fingers again.
 The plan was to lift the assembly out and then tent the area so that he could cut off the brand-new midfeather bearing. Just to be safe, he bought two new bearings for the job.
 I always appreciate how good he is about safety: respirator + eye and ear protection. I was worried about him being under plastic like that but he survived.
 The photos are not adequate but you can see a few sparks above his left shoulder. Not only did he have to cut off the bearing, but he had to then polish the end of the shaft to ensure that the new bearing would seat.
  By now, I was feeling desperate as I hadn't made paper for a while. The beater went down months ago and we were delayed by the machine itself, my trip abroad, and his getting Covid after I returned. Plus, life! So for a while I went every day for a week and beat on a batch of mutt fiber: milkweed, Thai mulberry, Florida mulberry, scrapings, kudzu, salago, and who knows what else. Bits and pieces of things I had saved over the years, nothing big enough for its own batch. It made great hanji and I'm still convinced that milkweed forms and parts better than paper mulberry.
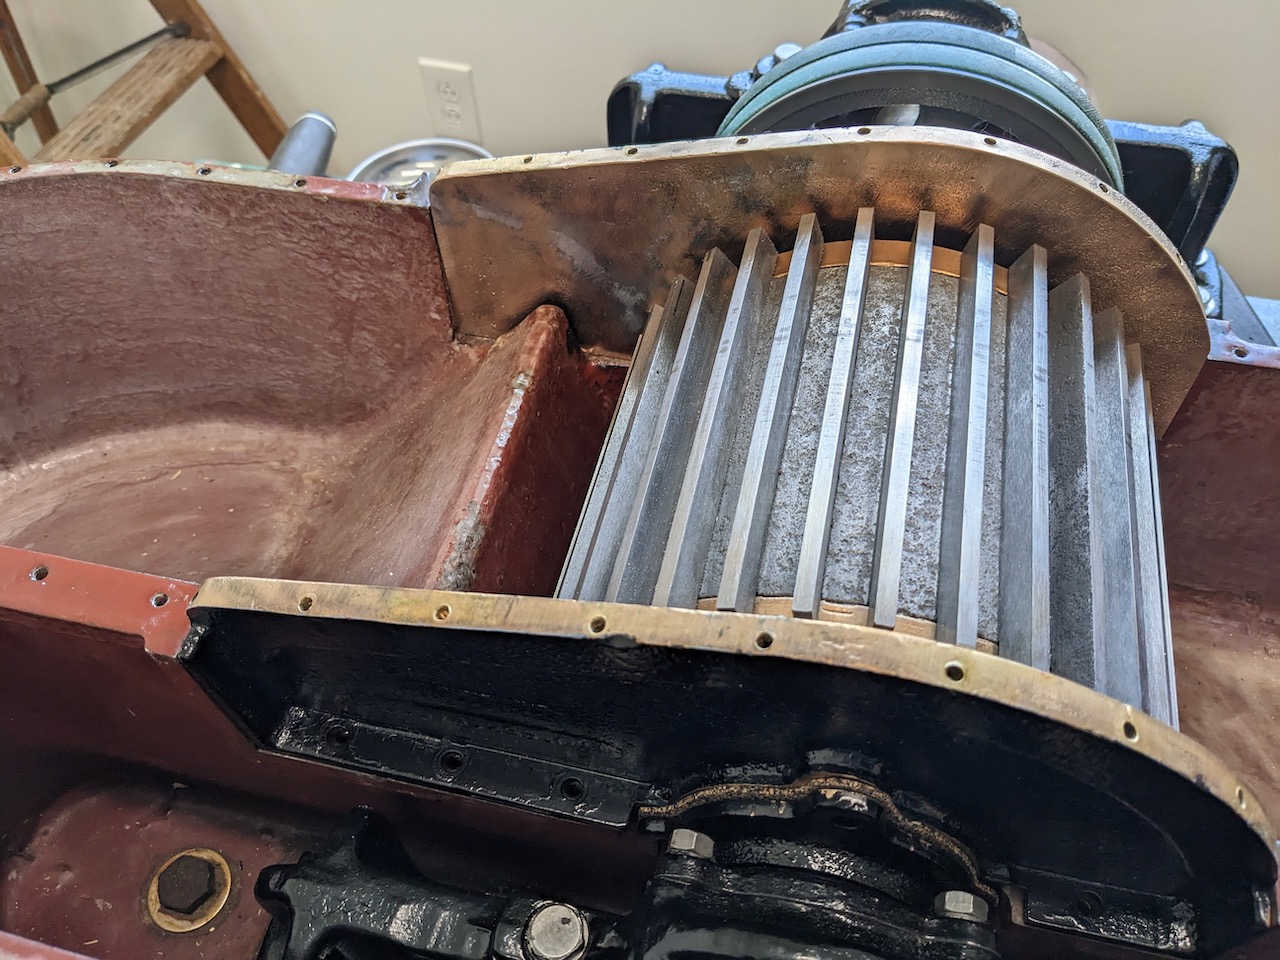 Once Bill worked his magic, the bearing seated properly! It was still NOT easy to get the assembly back in because of how imbalanced it was as we lowered it—the straps could only fit on certain parts of the shaft so we didn't have even weight distribution. The inner support arm kept leaning and getting stuck diagonally in the midfeather section but he finally got it onto what was left of the locating pins and bolt it in. Shields went back up on the sides but are not screwed in in this picture; see how nicely he cleaned everything? He even repainted everything that was black!
  Bill got new hardware for everything that was rusted out. The new belts and the motor went back into place and I secured the switch cover, don't worry.
 I still can't get over how shiny the bolts are. This is the best it will look because soon I will destroy it all again. And we will never see the roll so clean (with luck, we'll never have to open the lid again).
 Based on this custom Valley lid that is much more easily removed than the original, owned by one of the very nice men, I thought, is that baffle soldered to the underside of the main lid really that important? Part of this came from how hard it was to remove the jam with that piece intact. I asked Bill to remove it only because it looked so messy. The workmanship on it, I assumed, was not from the factory.
 I was wrong! I did notice it on some original drawings of the beater that were shared on the Hollander Beaters group online but by then we had pulled it off. I posted to share what I did that and learned that it is there to help with circulation and pushing stuff up past the backfall. But I figured, if my colleague gets nice rag paper from his lid, why not? [forgetting that he can remove the lid each time and clean out whatever mess is in there each time.] My beater is the only Valley I've worked with whose circulation is so rapid that the slurry pours out the back u-turn end, making a mess and losing fiber. Bill already helped me last year make a cover for that area. We got the lid back on, which required more hardware shopping (the beater arrived with less than a full complement of screws and the stainless hex-head ones I used later were too long so I had to get nuts as well). The blue tape is covering the holes for the original name plate, which was long gone before I met this guy.
 There's the extra cover to the left. The circulation, as the group members confirmed (after my misjudgement) is slower than usual but it doesn't spit out the end like it used to. This was also a very easy batch of well-soaked BFK scraps (only one of the original weights arrived with the machine, so I got circular weights from the used sporting goods store and put them on carabiners to clip onto the arm that pushes the bedplate closer to the roll). It leaked like mad because there was no more old stuck pulp to swell and close the gaps. I went overboard with blue mechanic's goo before realizing I needed to fetch my clear silicone and caulk gun to do a less messy job, which made me sad because Bill had worked so hard refinishing the parts! To staunch leaking in other spots I'll try abaca.
 After very hasty pigmenting, I pulled the load, which contains metal bits from cutting off the bearing and polishing it, plus metal filings from the roll. It did fine and is not as loud as it used to be. Soaking now: the terrible rags that started the disaster. The group has shared more info on how to beat it safely, and only then did I remember that I used to chunk rag more with fixed bedplate beaters (rather than this, which has a fixed roll and moving bedplate). I worried that I should not share my experience with the group because I am a woman and I am not mechanical, but I did and felt shamed and stupid afterwards. After years of interviewing tool and equipment making folks (who of course are different from papermakers themselves), I know they are quite kind and incessantly curious. I haven't finished my manuscript yet because I'm overwhelmed by work that I feel better suited for, but one reason I tried was to highlight how it feels as a woman making paper who is bad with machines. I have to know my tools to do the best work (and boy do I understand this beater much better than before we ripped it apart and put it back together). But I have to ask for so much help because I'm built for other things.
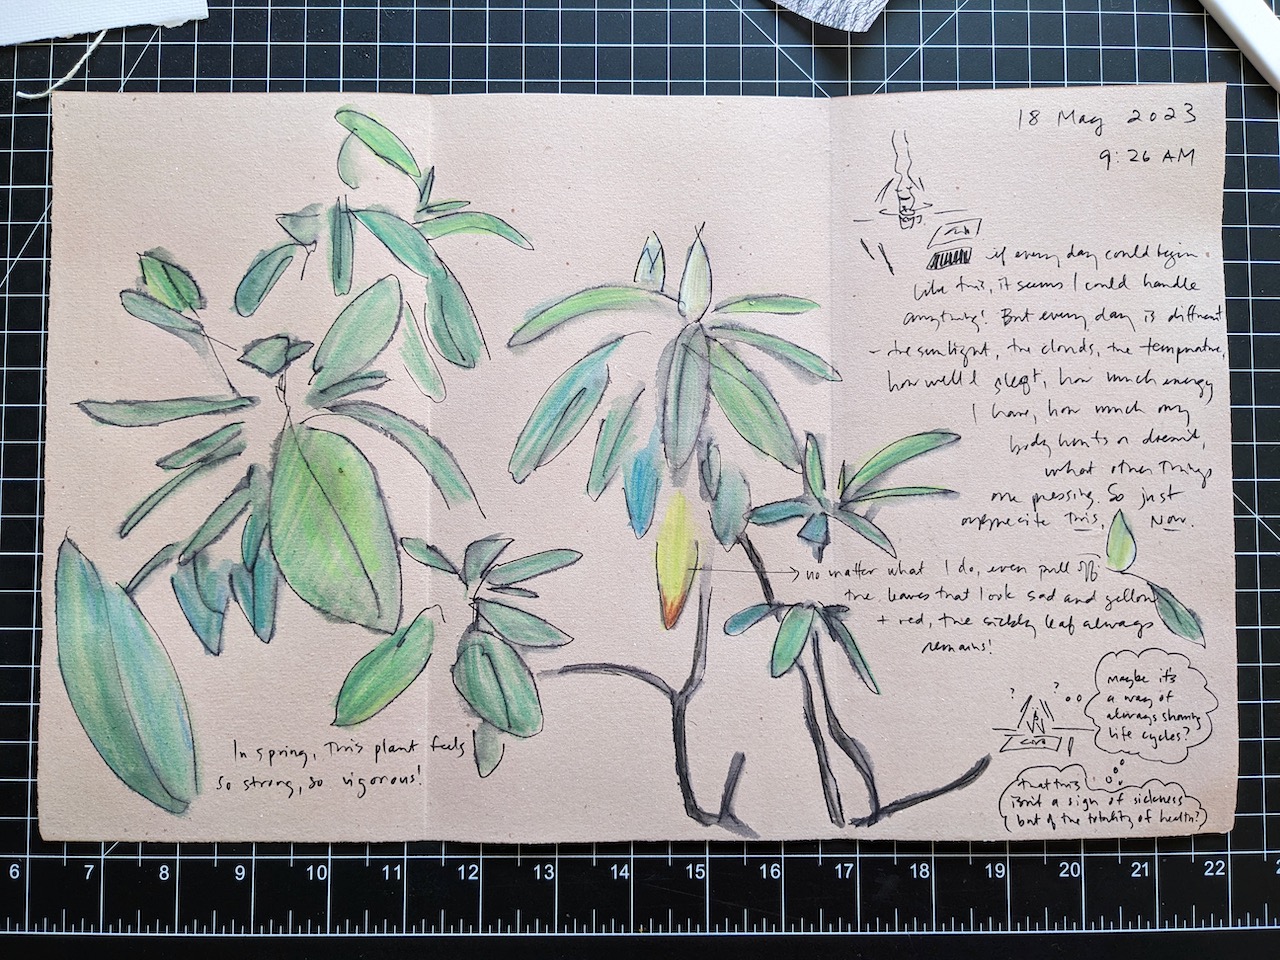 So how do I ask for help in a way that doesn't diminish how I feel about myself? Let's pray that Bill stays friends with me after this months-long saga, and that the men I consulted return emails in the future. First, I know I am fortunate to even know who to turn to in the first place. Second, I'm proud that I have taught students who then go onto really learn how to fix and take care of machines—they didn't learn it from me but maybe did learn that it's important to do this if you can.
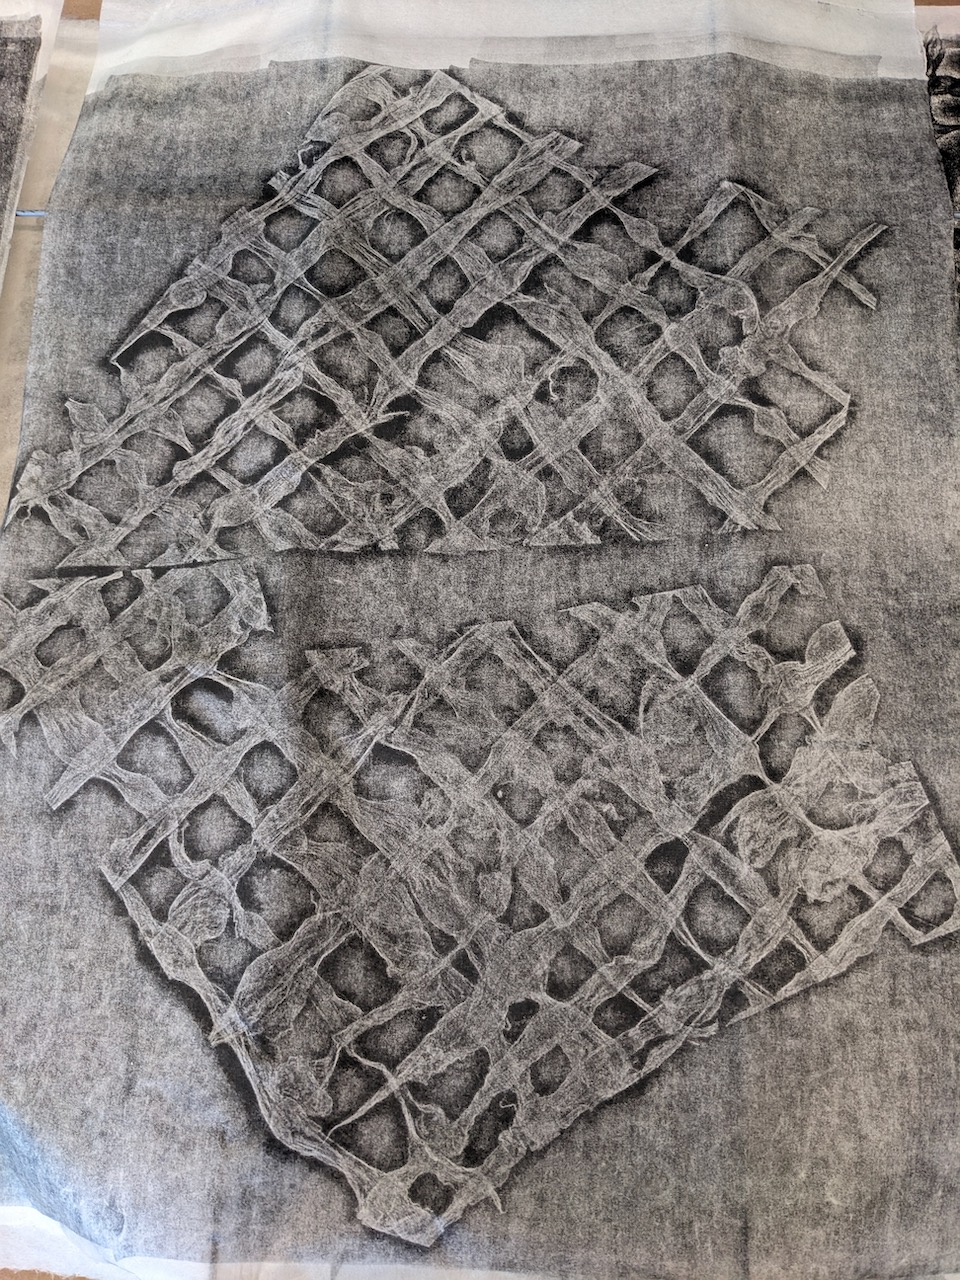
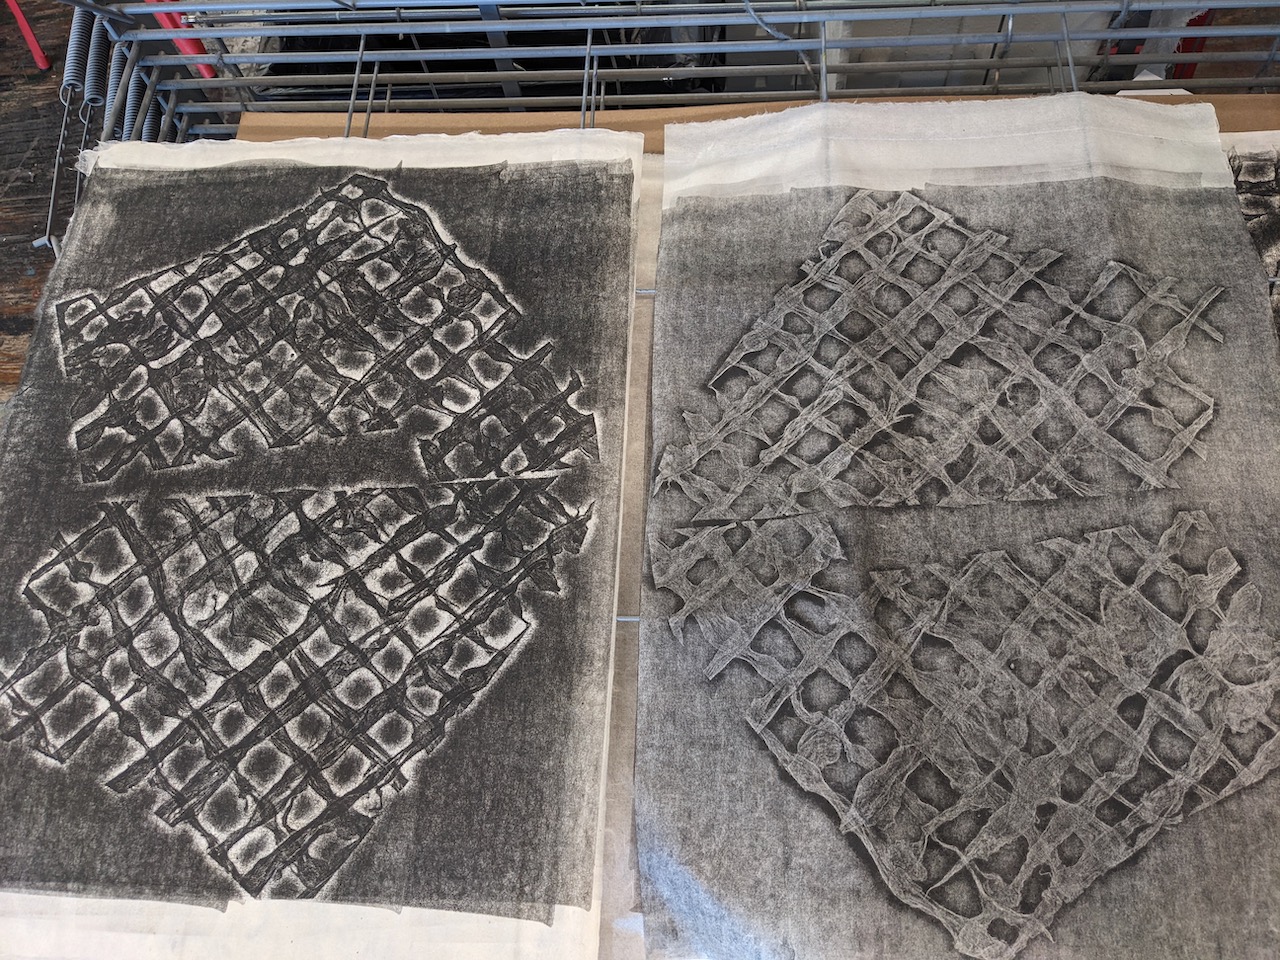
Much of my toolmakers research stemmed from a fear that people thought all I knew was hanji, a desire for people not to assume that because I look Korean, all I do are Korean things...as if it wasn't enough to be so vastly well-versed in the hanji world. Plus, I wanted to better understand how how people become toolmakers, because I'll never do it yet can't do my own work without it. For now, my beater is up and running. I didn't grind it in because I hate cleaning carborundum grit out of the beater and having several batches of sandpaper afterwards. I'll see how it runs first and lap in only if it's underperforming severely. Good thing I am a papermaking artist and not a production papermaker! Above is the first drawing I made on the new batch of the old machine.
Hollander Beaters IO group: where you will hear a lot from Kevin Martin of Papertrail, one of the very nice men, along with Drew and two others I will leave nameless because I don't want anyone to bother them with questions about beaters.
Update: the rag that clogged the machine so badly that I had to open it went thru fine in the new refurbishment, and now without the baffle under the lid, the slurry no longer sloshes out the back end. Nothing getting stuck ahead of the backfall, either.